Its all yoga, all the time for me! Throughout my day - doing bodywork, teaching yoga, running a business, working in the garden, relaxing with friends and puppies in this beautiful state of New Mexico - my life is infused with yoga. I love the deeper awareness of my body, mind, soul that it brings me; love the deeper connection it enables me to experience with the world around it; and REALLY love that I am able to share this beauty with others.

I know its not always possible to connect with other yogis, that we all need extra inspiration in our own practices, and sometimes even a little kick in the butt to get into that yoga zone. I hope this blog will help you with that (and me, too!) as I share pieces of my classes, practices and inspiration with you.
Showing posts with label Yoga del Sol. Show all posts

Friday, January 31, 2014

Anatomy and Asana for WRISTS!

Last night at Yoga del Sol, I led a Asana and Anatomy workshop on Wrists.  As promised, here are my notes from the class.  Notes are never a complete class or explanation, so feel free to ask if you have questions....


 ANATOMY - 8 carpals (PRACTICE - find a partner, see if you can feel all 8 bones:-), they articular with each other, with the metacarpals on your hand and with the radius, (The ulna articulates with a disc rather than the bones themselves) No two of these bones have the same movements! That’s one complicated joint! Actually almost like many different joints. These bones are circled by a retinaculum. This thick band of connective tissue is like a cuff holding the bones and holding the long tendons that run elbow to fingers in place close to the bone. That’s alot literally bound up in there. PRACTICE - on one another, smooth out the flexor (palmar) retinaculum.

There are NO muscles specific to the wrist! There are muscles that pass through the wrist and the wrist itself is controlled by the muscles of the forearms. So how do we support the wrist when we are in poses that are weight bearing or creating force on the wrist? We have to use the forearms, which are usually weak and tight from everyday use. Its a funny thing, when we are weightbearing on our feet in yoga, we get that we have to engage the feet and the legs, its the only way to stand tall. But when we are weightbearing on the hands, we tend to just let them be curled and soft. Initially, it may be uncomfortable to support the hands as we develop strength and flexibility in the muscles but it must be done if they are to do their job.
PRACTICE – Lifting the arch of the hand. Notice that there is an indentation in the palm of your hand. With your hand flat, Increase the depth of that indentation. You can do this looking at the palm of your hand and seeing it happen. You should do this with every posture that is weightbearing on your wrists. Try it in table, Down Dog, and Plank – palms down, fingers wide, lifting the arch of the hand. You will feel this in your hands and forearms.

The nerves that pass through the wrist mostly originate in the neck. Nerve pain felt in the wrist could be a result though of compression anywhere from the neck to the wrist.

Common Wrist Syndromes:
Tendonitis, Rheumatoid Arthritis, Osteaoarthritis, Carpel Tunnel Syndrome, Thoracic Outlet Syndrome

There is an arch in the carpals - the carpal tunnel - many tendons pass through here as does a major nerve. If the retinaculum is tight or the bones have shifted or there is inflammation in the tendons, this will cause irritation of the nerve as it rubs against its surroundings and becomes compressed.

PRACTICES for improving ROM and Strength in the Wrists:
moving each finger joint with the wrist in neutral. Can even use the other hand to limit the movement of other joints. Work with both flexion and extension. And work with moving one finger at a time.

Strengthen by bending first joint and pressing outward to lengthen fingers to straight. This is done with the wrist bent. Can resist with other palm or floor.

Hand in fist by side working with lateral flexion. Can also be done with a weight in hand.

Hand in fist, elbow flexed, flex and extend wrist. Can also be done with weights.

Losing ROM in larger joints (i.e. shoulders) places greater strain on smaller joints (ie elbows and wrists) we are very familiar with this of course in relation to knees and hips, but also true in wrists esp for poses that put pressure on the wrists. Opening your shoulders can make your wrists happier :-)

Tightness in the muscles over your thoracic outlet can not just impinger nerves creating pain in wrists, but can restrict blood/oxygen flow further exacerbating the situation and making healing challenging. Rounded upper back, hunched shoulders = bad news for wrists.

Even a misalignment in your hip or spine can contribute to wrist pain (see above). So, for the best possible comfort in a pose, esp a pose with weighted hands, watch the alignment of your WHOLE body!

Practices for encouraging full ROM in shoulders:
PRACTICE - Facing wall, pigeon toed to encourage lumbar curve - arms up back of hands to wall, then quarter way down, then halfway down, holding about 1 minute in each position. This encourages proper ROM function and engagement in shoulders, elbows, and wrists. Don’t strain but notice where you feel restriction, this gives you info as to what to work on to gain greater everyday comfort.

PRACTICE – Supported Fish

PRACTICES TO BRING INTO YOUR ASANA TO ALLEVIATE STRAIN ON THE WRISTS:
PRACTICE - arm in front of you with palm down. Rotate your palm up. You cannot do this without moving your whole arm - it requires proper mobility in shoulder and elbow, not just wrist. We do this rotation in the shoulder in Downward Dog to engage the shoulder and and serratus anterior without compromising the thoracic outlet - this also helps alleviate pressure on your wrist as you are no longer “hanging out” in your joints. TRY IT in Down Dog, plank and table pose.

Whenever your wrist rotates, the ulna and radius cross over each other like crossing your fingers. This narrows your wrist, particularly inhibiting if you have carpel tunnel syndrome. This repetitive motion can cause pain and burning in the wrist. PRACTICE- Down Dog, Plank and table without rotating the wrist. Anytime you have a body part weighted on the floor, you always want the most surface area possible! This can also be an eye-opening practice in Side Plank. Just remember, Side Plank is an awesome pose for wrists when your alignment is right on (lining up your wrist, elbow and shoulder joints vertically) but its a TERRIBLE pose for your wrists when your alignment is off.

PRACTICE - stand with elbow tucked in to side, bent to 90 and palm up. Now, rotate your palm down keeping your elbow tucked in. If the palm doesn’t turn all the way over, it may be because the elbow doesn’t have its proper range of motion and is asking the wrist to do more rotation than its built for. This limitation in the elbow may be coming from elbow or shoulder. Working with this rotation with both palm and Shoulder/Upper Arm fixed can really change your Chataraga for the good!

*Basic reminders for poses where the hands are weightbearing -
Press palms down with fingers spread wide
Lift the arch of your hand
Turn the eyes of your elbows forward without locking your elbows.

*In Chataranga and Plank – type poses, remember they are core poses NOT upper body poses, reach back through your heels, engage your core!

*In Down Dog-type poses, don't worry about getting your heels to the floor. Bend the knees and take your weight back, chest toward knees and reduce the angle of your wrists (they should be coming toward flat toward the floor.

Good references:
Pain Free by Pete Egoscue for whole body practices
Yoga Body by Judith Hanson Lasater – text not practices.
Anatronica.com or Gray's Anatomy for anatomy


Thursday, September 19, 2013

A Deep, Sweet Hip Opening Posture

Figure four stretch is a lovely way to release long-held tensions in your hips. With slight adjustments in the angles of your knee you can reach and stretch all 6 deep hip rotators, your glutes and the lowest of your low back muscles. Check out this video for a sweet way to let it all go using the wall for support. A great resting posture!


Thursday, June 27, 2013

Cool Yoga for Hot Days

With temperatures beginning to soar, a vigorous yoga practice can conjure images of slipping and sliding in your sweat on your sticky mat.  Yuck!  Instead, use your practice to cool down and take a mini-vacation...

Here's a few things to remember when practicing to cool your body and mind:
1.  Take it slow and take it easy.  Pushing into a posture, even while using your breath as a guide can build heat and soon have you dripping as much as a more obviously dynamic practice.
2.  As you relax, your body temperature naturally drops.  In this hot weather, this is a welcome respite!
3.  Practicing in the sun will not only heat you up but will zap your energy.  Find a shady spot or practice indoors.
4.  Even if you feel cool, drink lots of water.  If its hot out, especially in dry climates, your sweat may be evaporating before you really notice it.  Hydration is important for cooling and for keeping your muscles supple.

Ease into this cooling practice with the above principles in mind. If you find yourself heating up, take a savasana/relaxation pose.  You can never have too much relaxation!

Pranayama/Breathing Practice:  Use your favorite yoga breath or simply breath fully and completely.  For the first half of your active practice pause the breath at the top of each inhale, this will help build your capacity of your lungs and helping to slow your movements. For the second half of your active practice, pause your breath at the bottom of each exhale, this will signal your parasympathetic nervous system to do its job of relaxing and cooling your body and mind.

Begin pausing breath after inhale...
1. Prasarita Padasana.  Start on your back, knees to chest, arms by your sides.  As you inhale, lift feet toward sky and bring your arms up and by your ears.  As you exhale, return your knees to chest and arms by your sides.  Repeat slowly 8-10x.


2.  Supta Matsyendrasa.  On your back, bring your arms out to the sides in a lazy T.  Scooch your hips a few inches to the right and bend your right knee.  Take that right knee across your body, rolling onto your left hip with your shoulders still on the floor.  Hold your posture with subtle adjustments 8-10 breaths.  Repeat on the other side.


3. Uttanasana.  Come to standing and fold forward from your hips.  Let your knees bend until your belly touches your thighs and your low back relaxes.  Hang from your hips 8-10 breaths and exit the posture SLOWLY.


For the remaining postures, pause breath after exhale...
4.  Ardha Chandrasana.  Stand with your weight even on your feet, arms overhead.  As you exhale, take your hips to one side as you bend to the other side keeping your whole body facing forward and your weight even.  Inhale to center, exhale to the other side.  Repeat 5-7x each side.


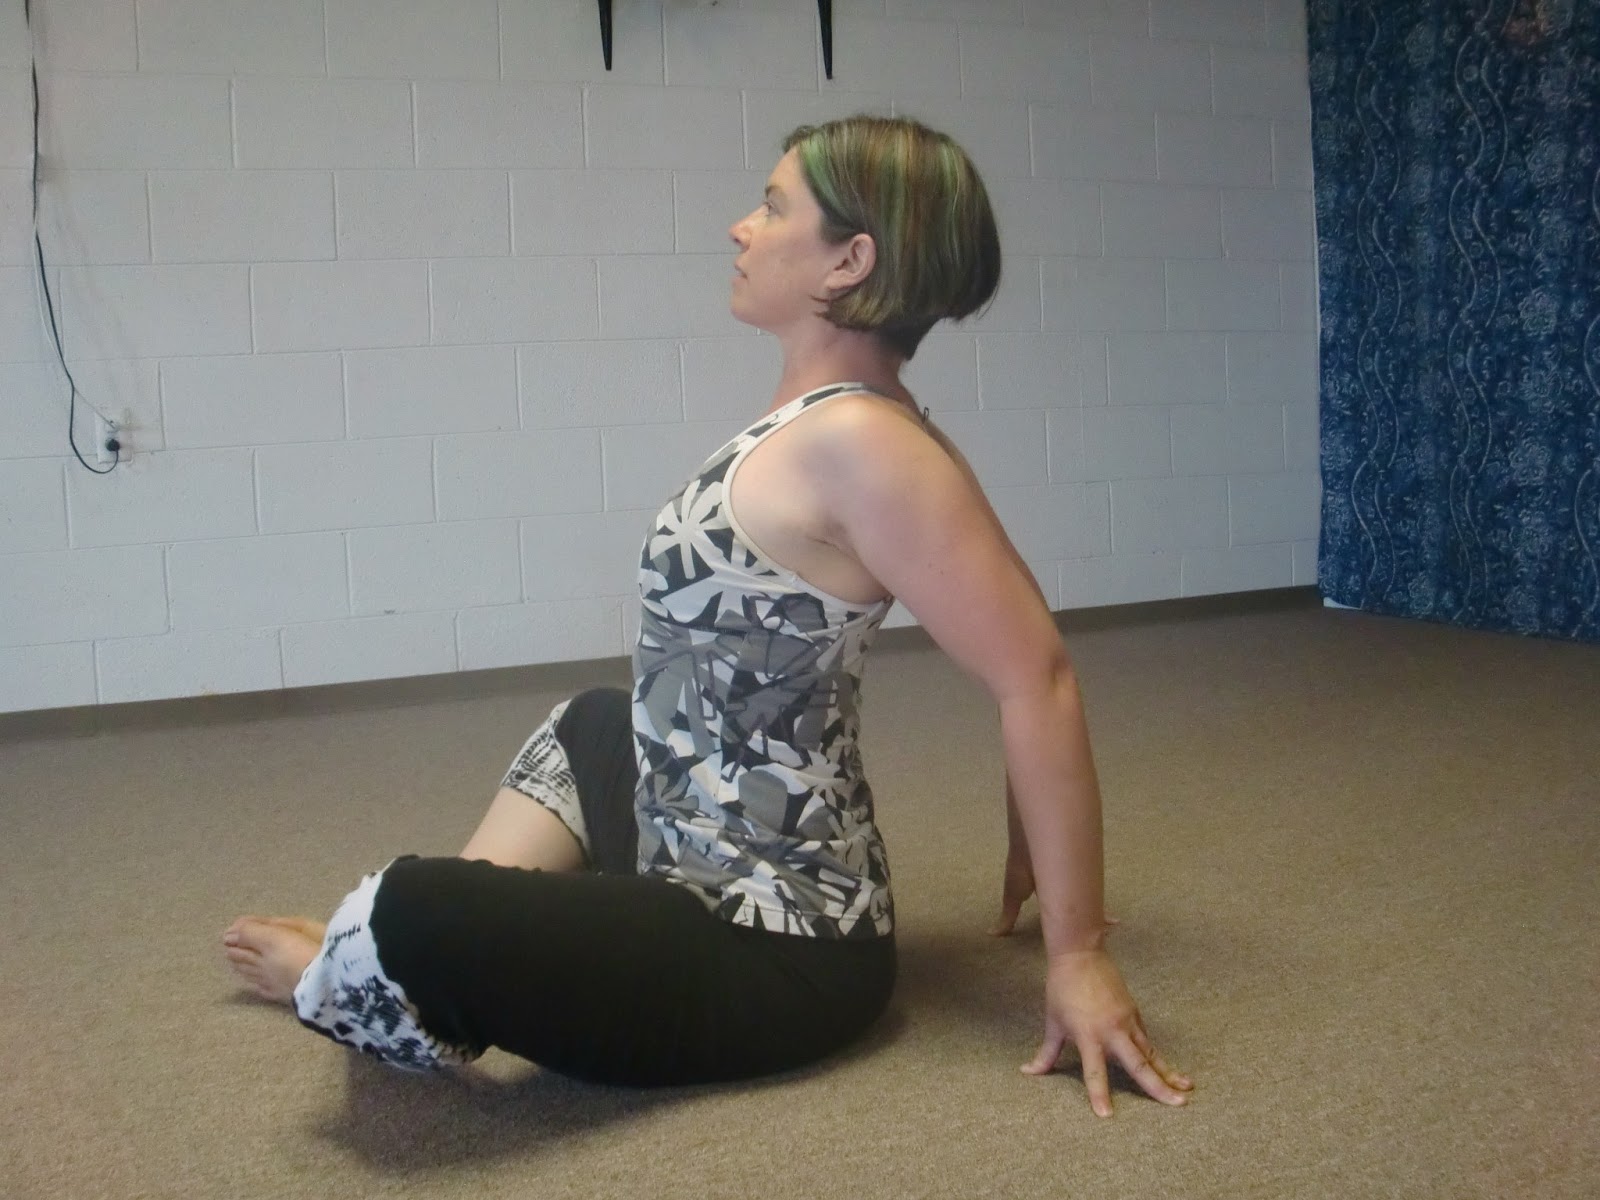
5.  Baddha Konasana Backbend.  Come to seated with the soles of your feet gently pressing together.  Reach your knees downward.  Bring your fingertips to the floor behind you, bending you elbows for comfort as you draw the shoulders back and lift your sternum.  Hold 8-10 breaths.


6. Upavista Konasana.  Stretch your legs out wide.  Press through the soles of your feet as you draw your thighs gently into your hips.  Keep your knees as bent as you need to for comfort.  Keep your back straight as you fold from your hips, taking your tail toward the back of your mat.  Go as far as you can with ease and stay there 8-10 breaths.


7.  Apanasana.  On your back, bend your knees and place your hands on your kneecaps, elbows straight.  Completely relax your legs.  As you exhale, use the least amount of effort possible to bend your elbows, bringing your legs along for the ride.  As you inhale straighten your elbows, legs along for the ride.  Repeat 8-10x.


8.  Savasana.  Lie comfortably 8-10 minutes, letting your breath move of its own accord.


9.  Seated Breathing/Meditation.  Sit tall and comfortable. Bring your inhale and exhale both to a count of 5.  Repeat for 20-30 breaths before closing your practice.


Wednesday, June 19, 2013

Coming back to Center

Sometimes life gets away from us and it feels like we are traveling at the speed of light unable to focus and unable to stop.  Yoga can be an incredible tool for bringing us back to center.  Use this audiofile to put on the brakes and coast back to center in your life, leaving you more productive, more aware and maybe just bit more able to handle whatever is coming at you.  Centering is a great way to begin or end a practice or to find a moment of calm anytime during your day.  I hope you find it helpful in your life!


Friday, March 1, 2013

Massage your Upper Back with this Bridge Pose variation

Here's a great pose to add in to your practice when that upper back feels tight - it gets right into those rhomboids! I learned this variation of Bridge Pose from Gary Krafstow years ago and its still one of my favorites.  He calls it Dvi Pada Pithum, the 2-footed posture.  I think this is a great way to think of it because it reminds us that our base is still our two feet.  This helps to keep weight in the feet, work in the legs and avoids too much pressure into the shoulders, upper back and neck.

Dvi Pada Pithum.
Hips up, shoulders down
Dvi Pada Pithum.
Hips down, shoulders up
Dvi Pada Pithum. In transit


Lie on your back, soles on the floor hip width apart, knees bent.  Bring your arms up toward the sky and interlace your fingers, palms moving together.

On your inhale, press down with your straight arms and your feet rolling your hips and back upward.  The shoulders are pressed into the floor by your straight arms.

On your exhale, roll your back down as you lift your hands toward the sky thus lifting your shoulders. No need to lift your head.

Each breath's actions are simultaneous not one at a time. So, as you inhale, its hips rising and shoulders pressing down. As you exhale, its back rolling down as the shoulders lift.

As with all bridge pose variations, you want no pressure on your spine or in your neck, this is a sign you are going too far.

If you have been experiencing discomfort in your upper back and shoulders for a while, especially if you have that awful stabbing pain between your shoulder blades, follow Dvi Pada Pithum with supported fish to really help release the upper back muscles and open your chest.  Deep breaths to feed muscles and relaxation :-)

Friday, February 22, 2013

BREATHE!


Podcast Powered By Podbean


In times of stress or pain, one of the first things we usually do is stop taking deep breaths exactly when we need them most.  This breath awareness and pranayama practice will help you cultivate a deeper breath and a deeper awareness of your breath; so when the going gets tough, you can breath/breeze right through it!  Click on the player to listen or visit http://yogadelsolstudio.podbean.com/ to listen to this and other short audio classes with me.

Friday, February 8, 2013

Shoulder Exploration and Strengthening!

Understanding your shoulders is key to avoiding injury in this relatively weak joint. Explore downward facing dog and dolphin pose to feel how all the muscles work together to keep you safe and strong.

A warm up is advised prior to this brief but powerful exploration... consider warm ups to open the spine (i.e. 6 movements of the spine, sun salutations), shoulders (i.e. sun breaths, arm circles, cactus/robot arms), and wrists (i.e.anjali mudra variations, wrist circles, tractioning wrists). These same practices as cool downs (plus poses like bridge and reclining twists) will help to prevent soreness the next day.

 This practice is helpful for all, but especially those beginning to explore arm balances.


Tuesday, January 8, 2013

Shoulder Relief!

Shoulders feeling tight, noisy, slumped?  Neck achy, maybe nonexistent?  This is the practice for you.  Short, sweet and effective... give your shoulders a little relief in your practice, at your desk, whereever you may be!

Click here or below to access our practice.


Podcast Powered By Podbean

Wednesday, August 8, 2012

Moon Salutation Practice

This variation of one of the many Moon Salutations (Chandra Namaskar) is a great full body strengthener.  Incorporating backbends, forward bends and side bends it is also great for improving overall flexibility.  Follow along as I lead you through one round, then repeat as you like for a rejuvenating yoga practice!


Wednesday, July 18, 2012

Don't Just Sit There, Try a Moving Meditation Practice!

Can't handle sitting still, but know that meditation would be good for you?  Maybe moving meditations would be more your style.  Check out the video below based on our first class from this summer's Moving Meditation Class Series and see how it works for you!  After all, meditation is scientifically proven to be good for you :-)


Wednesday, July 11, 2012

Yoga for Healthy Hands!

We are starting a 2 class series on Yoga for Healthy Hands tonight.  We will explore the anatomy of function and disfunction in hands and wrists - bones, muscles, nerves - to gain a better understanding of how to keep them feeling great.  This will include massage techniques and modifications for your yoga practice.  If you can't join us for the juicy details, give the home practice below a whirl - your hands will thank you for it!


Healthy Hands Home Practice

  1. Hand Clenching: Bring your arms straight in front of you at shoulder height. Palms facing each other. Close your hand into a fist with the thumb inside, then open your hand .spreading the fingers wide.
  1. Wrist Bending: With your arms still straight in front of you at shoulder height, turn your palms to face away from you with fingers pointing up. Keep your fingers straight as you bend you wrist to point the fingers down, then back up again.
  1. Wrist Rotation: Right arm straight in front of you at shoulder height, fold your hand into a fist with the thumb inside. Rotate your wrist in one direction (10x), then the other (10x). Take one full breath to make one full rotation.
    Repeat with the left wrist.
    Both wrists at once (again, one direction, then the other).
    Both wrists at once in opposite directions (again, one way, then the other).
    *Keep the rotation in the wrist, not the elbow or shoulder.
  1. Elbow Bending: Arms straight out in front of you at shoulder height, turn your palms to face up. Bend at the elbows to bring your fingers to your shoulders, then extend your arms again.
    Repeat with the arms out to the sides, still at shoulder height. 10x
  1. Shoulder circles: Bring your right fingertips to your right shoulder. Move the right elbow in a big circle (one full circle for one full breath). 10x
    Repeat in the other direction.
    Repeat on the left (both directions)
    Repeat with both arms at once (one direction, then the other), trying to touch your elbows together in front.
  2. Table pose with forearm engagement: Come to all fours, knees under hips, wrists under shoulders. Spread your fingers wide with your middle finger pointing straight ahead. Lift the very center of your palm upward while pressing down through the outside edges of your hands and fingers. Weight evenly distributed. Hold for 3 breaths, then relax. 10X. For more challenge, lift your knees and reach through your heels (plank pose) while doing this work with your hands/forearms.
  3. Side Plank Pose: From all fours, bring your weight into your right hand (engaging the hand/forearm just as you did in the last pose) and right leg. Pull your arm into the shoulder socket and stack your left shoulder and hip over the right as you extend the left leg, placing your foot on the floor. Hold 10 breaths. Rest. Repeat on the other side.
  4. Cactus Arms/Robot Arms: Lie on your back, arms out to sides. Bend your elbows to 90 to look like a saguaro cactus, backs of the hands dropping toward the floor.
    Turn from the shoulder to bring your palms toward the floor, fingers pointing toward your feet (this is robot arms, a little like a wizard of oz scarecrow move).
    Move back and forth between the two 10X
  5. Supported Fish Pose: Roll a blanket or a towel up, making sure it is at least as long as your spine. Lie back, spine along the blanket, arms open to the sides. Stay here, relax, at least 10 breaths.

Monday, July 9, 2012

Getting Started - Warm Up Practice

There is no better way to get started than warm ups.  And as we are just getting this blog started... make some space on the floor, take a deep breath and click below for an audio track of my favorite ways to begin to connect to and open your body... Enjoy!