Here's an ambitious sequence to spend some time with, opening your shoulders and strengthening that all important pelvic floor. Remember when you are ambitious in your practice to take it slow and easy. Pushing into a pose never got anyone anything but hurt - body and self-esteem (sheepish after practice? Sure, that happens... but, thanks to a the learning experience it is, it doesn't happen much!) Practice well and safely, and enjoy yourself!
Kapalabhati
Arms overhead side stretches
6 movements of the spine
Fire hydrant
Sun Salutations with Inchworms
Arm nerve stretches (gun fingers stretching to sides, middle finger stretching overhead, twist reaching ring and pinky fingers across body)
Seated Cat/Dog with arms forward and back
Lunge <--> Parvotanasana
Side Angle <--> Triangle, then hold and bind Triangle
Uttanasana <--> Utkatasana
Alternate Nostril Kapalabhati
Maha Mudra --> Paschimottanasana --> Seated Navasana --> Bridge (then reverse and repeat)
Bound Angle
Bound Angle with Twist
Seated Wide Angle Forward Fold Side Bend
Seated Wide Angle Forward Fold Folding over 1 leg
Seated Wide Angle Forward Fold with Twist
Bound Angle with Feet Apart
Bound Angle with Feet Apart Twist opening chest toward sky
Marichiasana Prep - forward fold
Seated Boat with legs in Bound Angle, shoulders drop and hands hold heels
Seated Boat, holding toes, legs together <--> legs wide
Kurmasana
Bharadvajrasana
Bound Angle
Bridge
Synchronized Swimmer Twists (on back, arms wide, bring knees right, then straighten top leg and let is lead the bottom leg all the way to the left side. When you reach the left, bend the bottom knee, straighten the top leg and repeat)
Supported Fish
Savasana
Monday, November 11, 2013
Wednesday, October 23, 2013
Kriyas - coming closer to truth
All yoga practices are a cleansing of sorts - releasing stiffness from the body, releasing the mind from cycling thoughts. There are several Kriyas with a capital K in tantric yoga; these are often intense practices for cleansing the areas most congested, one of the most common is simply using the neti pot.
Through repetition, all of our asanas become kriyas. Consider this next time you practice. Move in and out of your postures with your breath multiple times feeling how this affects your body and beyond. Practicing in this way (much like we do in Slow Flow Yoga) shows us absolutely how our physical practice affects the metaphysical. Its an internal housecleaning that changes the atmosphere around and within you, bringing harmony to even contradictory aspects of yourself as you come closer to your own truth.
May the truth set you free!
Thursday, September 26, 2013
Triangle Poses for Stretch and Strength
So many triangles, so little time! In this short video, we explore 2 variations for triangle pose. One is best for flexible hips as it encourages stability in the hips. The other is better for tighter hips as it encourages greater flexibility. Try them both and find the one most appropriate for you to make your triangles really count in your practice.
Thursday, September 19, 2013
A Deep, Sweet Hip Opening Posture
Figure four stretch is a lovely way to release long-held tensions in your hips. With slight adjustments in the angles of your knee you can reach and stretch all 6 deep hip rotators, your glutes and the lowest of your low back muscles. Check out this video for a sweet way to let it all go using the wall for support. A great resting posture!
Friday, September 13, 2013
3 great yin poses for knees and ankles
First let me note that these are great yin/passive poses for healthy knees and ankles. They will help you to open greater range of motion and circulation in these areas, and provide an occasional chiropractic adjustment. If your knees and ankles are NOT healthy, proceed with great caution and take advantage of the prop suggestions. If you feel pain, you need to back things waaaaaaaay up and turn these poses into active poses instead of yin poses. Pain is a sign that these are poses you need muscular support to avoid injury. Yin poses are meant to provide NO muscular support. This is one reason that they work so effectively into your joints.
Seated Forward Fold
Wide Angle Forward Fold
Reclining Hero Pose is a wonderful opener for the ankles, moves deep into the knee joint and, through the backbending aspect, provides and especially effective opener for the lower belly and shoulders.
 |
| Reclining Hero Pose sometimes take a little prep with props.... |
 |
| but once you get there, ahhhh :-) |
 |
| If you need a little more lift, change us your props to accommodate. |
Seated Forward Fold
 |
| Placing blankets beneath the knees relieves strain on the hamstrings and delicate tissues of the knee joint. In both this and the next pose, you may feel pressure, even popping, in your ankles when you allow them to completely relax. This release is often needed and can feel great, but remember pain is never needed. |
Wide Angle Forward Fold
 |
| In a wide angle fold, the blankets under the knees again provide relief from strain in the knees. Using a bolster to prop your torso helps relieve strain in the inner thighs/medial knee. Be sure to angle the bolster so you feel just a light stretch to the inner knee area. |
Wednesday, September 4, 2013
The Yoga Cure for Forward Rolling Shoulders....
Got forward rolling shoulders? Most of us do! Its all that driving and computer work, doing too much work in front of us without strengthening the back of us. The following sequence will help with that....
Start off with 3 Yin (passive) poses to begin to release the primary muscles that cause forward shoulder roll...
Supported Fish - to open pec major
Supported Bridge (with your bolster long-wise on your back, so your shoulders don't quite touch the floor) - to open pec minor
Parsva Upavista Konasana - to open lats
Then move on to the strength and stretch...
work in your favorite range of motion movements for the shoulders, things like should and arm circles, sun breaths, breath of joy. Make sure you explore every direction.
Begin to access deep in the hips and the low back (where those pesky lats attach) with
Seated Knees Side to Side
Sit up with the knees to one side and begin to make circles with your top knee. Don't forget the other side.
Then lift your top foot off the floor and circle your lower leg from the knee. You will feel this in your hip! Don't forget the other side.
Give your arms a little love with wrist circles, keeping your elbows straight - try both open palms and fists.
Cobra pose - roll your shoulders back, lifting your sternum as is someone was holding you up in the pose by your shoulders
Cobra Pose with your fingers pointing back. Yup, that's right. If its ok with your wrists, take your usual cobra position, then move your hands a little closer to your waist and rotate your hands so your fingers point toward your toes. Remember, this is a baby cobra, no real weight will rest in your hands. Use your back muscles and remember to engage your serratus anterior (the side rib muscles)
Upward Facing Dog - bring in all that you just learned in Cobra Pose
Camel Pose to Child Pose - back and forth synchronizing with your breath. How much can you open your chest in Camel Pose? How relaxed can you be when you find Child's Pose?
Parsva Upavista Konasana - this time with engagement. Lengthen your waist, lift your top arm toward the sky and imagine turning your chest toward the sky.
Bridge Pose - can you make this feel a little like your cobra pose?
Puvana Muktasana - soothe those hard working back muscles.
Twisted Root - Wind those legs together into a reclined twist.
Savasana!
Wednesday, August 28, 2013
Connect and Relax with Yoga
You know that great feeling you have after a good practice - the one where you feel like you are a part of everything, totally connected to the world around you? Ah, yes, that's a beautiful feeling :-) Try the following exercise to connect one on one at a deeper level.
Grab a partner and sit back to back so you are supporting one another. Deepen your breath. Tune into each other and begin to feel one another's breath as it moves their back (and maybe even your's). Begin to sync your breath with your partner's. Stay here and breath as one.
Grab a partner and sit back to back so you are supporting one another. Deepen your breath. Tune into each other and begin to feel one another's breath as it moves their back (and maybe even your's). Begin to sync your breath with your partner's. Stay here and breath as one.
Friday, August 23, 2013
Set up your props and ENJOY reclining hero's pose
Reclining Hero's Pose is a wonderful opener for the front of the ankles, the quads and the lower belly. Since its such a great opener, it's also often not terribly comfortable for those that need it most. Here is an uber-propped version for those of you that need a little help getting there. You can use these props working with either the yin (passive) version of the pose or the more active version that asks you to squeeze your knees toward one another and point your tail toward your knees. Either way you choose to do the pose, know that this is not a pose in which you want to approach pain; your knees especially aren't the most stable joints so you want to be gentle with yourself. If your lower joints are healthy and open, you may choose to eliminate any props you don't find necessary.
There is a little engineering involved in setting up a pose with alot props. Make sure you have everything you need within arms reach before you start. And trust me, its all a lot more stable than it looks :-)
 In the first photo, you can see most of the props that you may need.
The rolled blanket under the ankles supports your ankles so that they do not have to bend as much under your body weight.
The rolled washcothes behind the knees helps to keep a little more space in the knee joint and reduce pressure there. When I don't have the rolls, I will often just pull my pantleg up behind my knee for a similar effect.
 The block is placed between the feet to support your bottom. The taller the block, the less pressure on your knees and ankles as you sit back. This block is the trickiest placement in our set up. Remember that it may move as you shift your bodyweight, so it can be helpful to place it at an angle in anticipation.
Lastly, stack your bolsters behind you where they will be supporting your back. Check out the last photo to see and alternate bolster and block placement that will give you a little more height for your back; thus lessing the stress on your quads.
 Once you are set up, lean back. Your weight will help keep everything in place. Grab a blanket as a pillow if you like and enjoy the opening!
There is a little engineering involved in setting up a pose with alot props. Make sure you have everything you need within arms reach before you start. And trust me, its all a lot more stable than it looks :-)
 In the first photo, you can see most of the props that you may need.
The rolled blanket under the ankles supports your ankles so that they do not have to bend as much under your body weight.
The rolled washcothes behind the knees helps to keep a little more space in the knee joint and reduce pressure there. When I don't have the rolls, I will often just pull my pantleg up behind my knee for a similar effect.
 The block is placed between the feet to support your bottom. The taller the block, the less pressure on your knees and ankles as you sit back. This block is the trickiest placement in our set up. Remember that it may move as you shift your bodyweight, so it can be helpful to place it at an angle in anticipation.
Lastly, stack your bolsters behind you where they will be supporting your back. Check out the last photo to see and alternate bolster and block placement that will give you a little more height for your back; thus lessing the stress on your quads.
Once you are set up, lean back. Your weight will help keep everything in place. Grab a blanket as a pillow if you like and enjoy the opening!Friday, August 16, 2013
Core Support - Accessing Your Pelvic Floor
Don't be sagging into yoga poses - rev up your energy, your life, your confidence with a little help from "down there" where strength and flexibility is critical to the health your internal organs and to the best, most confident posture of your life! Check out the audio below to learn how to find and tone your pelvic floor.
Podcast Powered By Podbean
Podcast Powered By Podbean
Thursday, August 8, 2013
How to maintain your yoga practice
As the Beatles sang,
Oh I get high with a little help from my friends
Yes I get by with a little help from my friends
With a little help from my friends"
Yogic philosophy gives us 6 "friends" that lead to maintaining a steady yoga practice. Consider asking them over next time you are a little reluctant to step onto your mat...
1. Enthusiasm
2. Courage
3. Perseverance
4. Discrimination
5. Unshakable faith
6. Abandonment of the company of people
**special thanks to TKV Desikachar's great book The Heart of Yoga for the simple translation of the 6 friends.
"Oh I get by with a little help from my friends
Mm going to try with a little help from my friendsOh I get high with a little help from my friends
Yes I get by with a little help from my friends
With a little help from my friends"
Yogic philosophy gives us 6 "friends" that lead to maintaining a steady yoga practice. Consider asking them over next time you are a little reluctant to step onto your mat...
1. Enthusiasm
2. Courage
3. Perseverance
4. Discrimination
5. Unshakable faith
6. Abandonment of the company of people
**special thanks to TKV Desikachar's great book The Heart of Yoga for the simple translation of the 6 friends.
Wednesday, July 31, 2013
Yoga... blindfolded?
Yoga is a very sensual experience. Usually, our eyes help us a great deal - letting us know where we are in space, what's up with our alignment, who's going by the window... For a deeper experience, take your eyes out of the equation. They are restless, always trying to gather information. By letting them take a back seat, you are able to gather more input from the rest of your senses.
To try this in your practice, simply tie a blindfold over your eyes (just closing them won't work as well, its too easy to peak). I don't recommend working much with balancing poses your first time, instead stay close to the floor :-) Many of the audio and video practices on this blog can safely be done blindfolded. Whatever your practice sequence, it'll be a whole new experience and help you gain new insight into your yoga and yourself!
To try this in your practice, simply tie a blindfold over your eyes (just closing them won't work as well, its too easy to peak). I don't recommend working much with balancing poses your first time, instead stay close to the floor :-) Many of the audio and video practices on this blog can safely be done blindfolded. Whatever your practice sequence, it'll be a whole new experience and help you gain new insight into your yoga and yourself!
Wednesday, July 24, 2013
Happy Yoga Feet!
Set your feet free! This simple move can have a dramatic effect - decreasing pain, increasing circulation and making balance and movement so much better. Take off those cramped shoes and help your feet to "breathe":-)
Wednesday, July 17, 2013
Yoga for Exploring the Hips and Low Back
Today's post is an exploration that will help open and stabilize both hips and low back. It is especially nice for the outer hips and deep in the hip socket itself, places we often forget or avoid. Take it easy, if you work too hard here, you might miss the juicy parts....
Use the Dirgha Pranayama for the entirety of this brief practice with emphasis on beginning your inhale in the low back and drawing your bellybutton up under your rib cage as you exhale.
Use the Dirgha Pranayama for the entirety of this brief practice with emphasis on beginning your inhale in the low back and drawing your bellybutton up under your rib cage as you exhale.
Start reclining...
-Draw your right leg in toward your chest and wrap your arms around it. Take a few breaths letting your hip and low back open.
-Release your leg and position your knee at a 90 degree angle directly over your hip. Circle your ankle in both directions at least 20 times.
-Bend your left knee, foot to the floor, and cross your right ankle over the left thigh. Adjust the ankle closer to your hip or closer to your knee until your find the "sweet spot". Reach your right knee AND the sole of your right foot toward the wall in front of you. Fell how this changes the engagement in your hips. Make sure your abs have engaged to keep your pelvis from torquing. You want this to be about the hips, not the spine. Take a few breaths here.
-Keep the engagement and draw your legs in toward your chest. Hold the back of your left thigh and bend and straighten that leg in rhythm with your breath at least 5 times.
-Keep the engagement and draw your legs in toward your chest. Hold the back of your left thigh and bend and straighten that leg in rhythm with your breath at least 5 times.
-Gently release your legs and rest a bit.
- Repeat on the other side
- Repeat on the other side
Come to seated on anything that makes you comfortable with your legs stretched out in front of you...
-Keep your left leg extended and place support under the knee if its not comfortable straight. Work your hamstrings and quads against one another to keep your extended knee from hyperextending.
Place your right ankle over your left thigh, just as you did in the previous sequence, and work both the knee and sole toward the floor. Fold forward with a neutral spine (moving just from the hips) if you can do so with ease. Stay here and remember to breath for a few breaths.
-Now move your right foot further to the left so the middle of your shin (more or less) is on your thigh and repeat the same action, holding for a few breaths.
-Next, move your left leg to the right (it will be at an angle from your hip) and move your right foot as close to the left hip and the floor as you can. In essence, you are working toward stacking your knees. Either work sole and knee downward again OR, if you right foot is on the floor, turn its sole toward the sky pointing the toes gently and use the heel of your hand to apply gentle pressure. Fold with a neutral spine, if desired. and hold for a few breaths.
-Unwind, rest, repeat on the other side.
Now practice these actions in two challenging poses.. double pigeon and cowface...
-For double pigeon, sit tall and stack your lower legs with your shins parallel to the front of your mat, letting your feet hang over your knees so you can reach the soles toward the floor. This is the fuller version of the pose. If your knees rise up or your hips say OMG, just back it up - take your knees wider and your feet closer together. You will only isometrically take your soles toward the floor. Stay tall or fold forward for a few breaths.
-For cowface, stack your knees with both legs bent, turn your soles toward the sky and use your hands to give gentle pressure to the ball of the foot. Feels too extreme, work with half cowface a little longer. You've already done half cowface once today - its the last in our seated pose sequence above. Enjoy your pose for a few breaths.
Remember to do both sides ;-)
Take a good long savasana after this to allow your body to integrate these challenging openings!
Friday, July 12, 2013
Yoga for Healthy Knees
The knee is a complicated joint and one of the most unstable in the body. It is also one that we often overlook in our yoga practice as we focus on our hips and feet and seem to notice our knees mostly when they hurt. They deserve more than this! Check out the anatomical discussion and asana exploration below to give your knees some more love in life...
One of the reasons the knees are so unstable is that there is no good fit where the bones can lend support like the ball and socket of the hip joint. It is primarily the muscles and ligaments that provide support. So, it is especially important that you have supple and strong muscles around your knee. The menisci are also important in knee function, providing padding to the inner and outer knee and helping the joint to track with the hip. If one of your menisci is damaged, you will need to compensate appropriately with props and muscular strengthening. The kneecap also helps keep the knee tracking with the hip and as it is encapsulated by your quadriceps, focussing on proper quadricep function can be helpful. Misalignment, especially in standing poses can cause inner or outer quads to become stronger than the other, resulting in your kneecap not tracking properly.
When muscles are too tight it can be difficult for them to function properly as nerve signals become impeded and circulation can be easily compromised. Thus we encourage a little stretch and flexibility in yoga poses to open the lines of communication where appropriate. However, if you are hyperflexible, having more than functional range of motion, encouraging more flexibility will have a detrimental effect, so decide appropriately. The knee does flexion and extension and a TINY bit of rotation (this can be explored in the knee release below). The ability to do this rotation is important to healthy knees but having or extorting too much rotation causes problems. Except for a few extreme poses, we always try to track the knee with the hip in yoga, especially when in is under load.
Knee pain can even be caused by excessive internal or external rotation of the hips, this is often an imbalance in the flexibility and strength of the hips, not the knees. The poses below will help you understand this concept.
I cannot help you diagnose what knee problems you might have, only your doctor or physical therapist can do that. But I hope that this down and dirty discussion encourages you to pick up an anatomy book (or look online) and explore your own knees through yoga. The more you know... the better you can feel!
When you practice, NEVER allow for pain in the knees. This is not a situation you can “push though.” And if your knees are already injured, it may require a great deal of patience in helping them to heal. What is most key in helping your knees live a better life is threefold – open your hips in all directions, make space in the knee joint, learn to use your muscles in stabilizing your knees.
Here's a practice to help you explore proper knee alignment and engagement...
Modified Hero Pose – Stand on your knees, with whatever padding you need beneath your ankles for comfort. Ensure that your toes point straight back. Take a rolled blanket and place in across the backs of your knees – the thicker the roll, the more intense this will be. Sit your hips back toward your heels, keeping your back straight. If your hips don't comfortably come to your heels, place a block beneath your bottom. Sit here for at least 2 minutes. This pose helps to gently stretch the quads, intrisic muscles of the knee and tibialis anterior in the lower leg without creating compression in the knee.
Knee release – seated with knee bent, hold one thigh to ensure it will not move. Move your toes to face in and then out, trying to bring as much of the movement from your knee as you can. This helps to release the muscles at the back of the knee and encourage full range of motion. Remember, your knee is not meant to move much except forward and back, so don't push it!
Anjaneyasana/ knee down lunge – keeping hips square and isometrically flexing front foot, inhale hips forward and back, in and out of the lunge, being mindful of the alignment of the front knee. Don't let it wing out or roll in. Then hold in a lunge, hands to floor, keeping knee pointing in same direction as the toes. Remember, taking your knee forward past your ankle creates strain on the knee is loadbearing postures.
Warrior 1 two ways and foot flexion – You may need the help of a partner to find your alignment for this one... Stand in a high lunge with all ten toes pointing straight ahead, back heel off the floor. Point both knees in the same direction. Square your hips. Once you are confident in your alignment in this version of Warrior 1, turn your back toes out a bit and bring your heel to the floor. As you do this, keep your hips as square forward as you can, keep the alignment of BOTH knees pointing in the same direction as your toes. This second version of Warrior 1 can cause torque on your back knee if your alignment is correct, so be extra careful to maintain that.
Triangle – Move into your triangle with more awareness not just of your knees always pointing in the same direction as your toes but with more awareness of NOT hyperextending the knees. Hyperextension means that the knee is locked into its most extreme straight position. This causes a stretching of the ligaments and ligaments have very little ability to “unstretch”. Work your hamstrings (back of the legs) and quads (front of the legs) against one another to keep a stabilizing slight bend in the knees.
Revolved Triangle – This is a great pose for exploring how your hips exert pressure on the knees. Keep the knees always pointing in the same direction as the toes, even as you twist your hips. Keep space in the knees here by pressing the feet into the floor and pulling your thighbones into your hip sockets, this will also help stabilize the low back. Remember not to hyperextend!
Standing Squat – This pose is great for learning to equalize support around your knees. Be sure you can see your toes when you look down so as not to overstress your knees – this means you need to stick your butt out! Having done the previous poses, you know a little more about your assymetries and strengths/weaknesses. See if you can bring your knees into alignment and provide equal muscular support all the way around with this pose.
Bow Pose – This is a great posture for really understanding how your knee alignment affects your low back and vice verse. Take bow pose keeping your knees hip width apart. You will need to be sure to support your low back with your abs. If this challenges either your low back or your knees, you've got some hip opening to work on ;-)
Wednesday, July 3, 2013
Nature Inspired Yoga


Thirteen miles in from the Grand Canyon's South Rim on a backpacking trip this May, we encountered this tremendous scene - Ribbon Falls. Overwhelmed by the beauty, it seemed necessary to do some yoga in celebration. My good friend Lee Dalton snapped these gorgeous pictures (thanks Lee!).
What beauty inspires your practice?
Thursday, June 27, 2013
Cool Yoga for Hot Days
With temperatures beginning to soar, a vigorous yoga practice can conjure images of slipping and sliding in your sweat on your sticky mat. Yuck! Instead, use your practice to cool down and take a mini-vacation...
Here's a few things to remember when practicing to cool your body and mind:
1. Take it slow and take it easy. Pushing into a posture, even while using your breath as a guide can build heat and soon have you dripping as much as a more obviously dynamic practice.
2. As you relax, your body temperature naturally drops. In this hot weather, this is a welcome respite!
3. Practicing in the sun will not only heat you up but will zap your energy. Find a shady spot or practice indoors.
4. Even if you feel cool, drink lots of water. If its hot out, especially in dry climates, your sweat may be evaporating before you really notice it. Hydration is important for cooling and for keeping your muscles supple.
Ease into this cooling practice with the above principles in mind. If you find yourself heating up, take a savasana/relaxation pose. You can never have too much relaxation!
Pranayama/Breathing Practice: Use your favorite yoga breath or simply breath fully and completely. For the first half of your active practice pause the breath at the top of each inhale, this will help build your capacity of your lungs and helping to slow your movements. For the second half of your active practice, pause your breath at the bottom of each exhale, this will signal your parasympathetic nervous system to do its job of relaxing and cooling your body and mind.
Begin pausing breath after inhale...
1. Prasarita Padasana. Start on your back, knees to chest, arms by your sides. As you inhale, lift feet toward sky and bring your arms up and by your ears. As you exhale, return your knees to chest and arms by your sides. Repeat slowly 8-10x.


2. Supta Matsyendrasa. On your back, bring your arms out to the sides in a lazy T. Scooch your hips a few inches to the right and bend your right knee. Take that right knee across your body, rolling onto your left hip with your shoulders still on the floor. Hold your posture with subtle adjustments 8-10 breaths. Repeat on the other side.
 3. Uttanasana. Come to standing and fold forward from your hips. Let your knees bend until your belly touches your thighs and your low back relaxes. Hang from your hips 8-10 breaths and exit the posture SLOWLY.
For the remaining postures, pause breath after exhale...
4. Ardha Chandrasana. Stand with your weight even on your feet, arms overhead. As you exhale, take your hips to one side as you bend to the other side keeping your whole body facing forward and your weight even. Inhale to center, exhale to the other side. Repeat 5-7x each side.


 5. Baddha Konasana Backbend. Come to seated with the soles of your feet gently pressing together. Reach your knees downward. Bring your fingertips to the floor behind you, bending you elbows for comfort as you draw the shoulders back and lift your sternum. Hold 8-10 breaths.
6. Upavista Konasana. Stretch your legs out wide. Press through the soles of your feet as you draw your thighs gently into your hips. Keep your knees as bent as you need to for comfort. Keep your back straight as you fold from your hips, taking your tail toward the back of your mat. Go as far as you can with ease and stay there 8-10 breaths.
7. Apanasana. On your back, bend your knees and place your hands on your kneecaps, elbows straight. Completely relax your legs. As you exhale, use the least amount of effort possible to bend your elbows, bringing your legs along for the ride. As you inhale straighten your elbows, legs along for the ride. Repeat 8-10x.


8. Savasana. Lie comfortably 8-10 minutes, letting your breath move of its own accord.
 9. Seated Breathing/Meditation. Sit tall and comfortable. Bring your inhale and exhale both to a count of 5. Repeat for 20-30 breaths before closing your practice.
Here's a few things to remember when practicing to cool your body and mind:
1. Take it slow and take it easy. Pushing into a posture, even while using your breath as a guide can build heat and soon have you dripping as much as a more obviously dynamic practice.
2. As you relax, your body temperature naturally drops. In this hot weather, this is a welcome respite!
3. Practicing in the sun will not only heat you up but will zap your energy. Find a shady spot or practice indoors.
4. Even if you feel cool, drink lots of water. If its hot out, especially in dry climates, your sweat may be evaporating before you really notice it. Hydration is important for cooling and for keeping your muscles supple.
Ease into this cooling practice with the above principles in mind. If you find yourself heating up, take a savasana/relaxation pose. You can never have too much relaxation!
Pranayama/Breathing Practice: Use your favorite yoga breath or simply breath fully and completely. For the first half of your active practice pause the breath at the top of each inhale, this will help build your capacity of your lungs and helping to slow your movements. For the second half of your active practice, pause your breath at the bottom of each exhale, this will signal your parasympathetic nervous system to do its job of relaxing and cooling your body and mind.
Begin pausing breath after inhale...
1. Prasarita Padasana. Start on your back, knees to chest, arms by your sides. As you inhale, lift feet toward sky and bring your arms up and by your ears. As you exhale, return your knees to chest and arms by your sides. Repeat slowly 8-10x.


2. Supta Matsyendrasa. On your back, bring your arms out to the sides in a lazy T. Scooch your hips a few inches to the right and bend your right knee. Take that right knee across your body, rolling onto your left hip with your shoulders still on the floor. Hold your posture with subtle adjustments 8-10 breaths. Repeat on the other side.

For the remaining postures, pause breath after exhale...
4. Ardha Chandrasana. Stand with your weight even on your feet, arms overhead. As you exhale, take your hips to one side as you bend to the other side keeping your whole body facing forward and your weight even. Inhale to center, exhale to the other side. Repeat 5-7x each side.


 5. Baddha Konasana Backbend. Come to seated with the soles of your feet gently pressing together. Reach your knees downward. Bring your fingertips to the floor behind you, bending you elbows for comfort as you draw the shoulders back and lift your sternum. Hold 8-10 breaths.
6. Upavista Konasana. Stretch your legs out wide. Press through the soles of your feet as you draw your thighs gently into your hips. Keep your knees as bent as you need to for comfort. Keep your back straight as you fold from your hips, taking your tail toward the back of your mat. Go as far as you can with ease and stay there 8-10 breaths.
7. Apanasana. On your back, bend your knees and place your hands on your kneecaps, elbows straight. Completely relax your legs. As you exhale, use the least amount of effort possible to bend your elbows, bringing your legs along for the ride. As you inhale straighten your elbows, legs along for the ride. Repeat 8-10x.


8. Savasana. Lie comfortably 8-10 minutes, letting your breath move of its own accord.
 9. Seated Breathing/Meditation. Sit tall and comfortable. Bring your inhale and exhale both to a count of 5. Repeat for 20-30 breaths before closing your practice.
Wednesday, June 19, 2013
Coming back to Center
Sometimes life gets away from us and it feels like we are traveling at the speed of light unable to focus and unable to stop. Yoga can be an incredible tool for bringing us back to center. Use this audiofile to put on the brakes and coast back to center in your life, leaving you more productive, more aware and maybe just bit more able to handle whatever is coming at you. Centering is a great way to begin or end a practice or to find a moment of calm anytime during your day. I hope you find it helpful in your life!
Wednesday, May 15, 2013
Your Amazing Brain
I remember a few years back, when Jill Bolte Taylor's book about her stroke came out and I heard many interviews with her about the experience. It was fascinating but at the time didn't seem immediately relevant to me. Then, just a couple weeks ago, I saw this TED talk she did on the subject and she blew my mind with the implications of how different the sides of our mind see the world and influence our interactions with it. I immediately saw correlations to my meditation practice and started looking at yoga a little differently. Here's the link to that talk, I won't tell you much about it, its great to watch it unfold. I hope it inspires your practice as much as it inspired mine.
Thursday, April 18, 2013
A great beginning, middle or end for your restorative yoga practice :-)
The following video shows you how to set up for what I call the "Laz E Boy posture;" a supported, semi-reclined posture that really allows you to really let go. It takes a little situating, and sometimes a little creativity with what props you have on hand (books and couch cushions are great!) but it sooooo worth it. So take a minute, set it up, and spend some time rejuvenating - anytime during your practice!
Friday, March 22, 2013
Have a Seat! Yoga for a comfortable meditation.
Here's a little practice to help prepare you for seated meditation - its helps to open the hips for a more comfortable seat and strengthen your core for an easier seat. While a comfortable seat is this practice's intended purpose, you will find it supports you well in everyday activities and improves your circulation, too. We did this practice last night in my Yoga and Meditation class followed by a 20 minute sit with the mantra meditation "I am". This mantra is a affirmation and a question, taking your mind and ego closer to knowing your true self. Give it a try!


Tuesday, March 12, 2013
Keep Your Hamstrings Happy with this Yoga Practice
Ah, our hams, too tight, too loose, pulled, they always seem to be on our mind in class. In the following sequence, that is entirely appropriate! This sequence is all about finding and exploring your hamstrings... inner, outer and middle; at the SITZ bone attachment and at the attachments below the knee, as well as their relationship to the surrounding msuculature. I hope it helps you gain a greater awareness and greater friendship with them :-)
Start with any warm ups you like and remember to work gently, especially at first, both when engaging and stretching and especially when you do both at once. While the stretch and/or strengthen or explore indicated may not be all that it happening in the pose, it is to give you a focus when working with the hams in the pose.
Downward Facing Dog - Stretch
Lunge - Stretch
Side Angle - Stretch and Strengthen
3 Legged Dog - Stretch and Strengthen
Plank - Strengthen
Lunge - Strengthen
Triangle - Stretch and Strengthen
Reverse Warrior - Strengthen
Intense Side Stretch - Stretch and Strengthen
Hero -Explore relationship to surrounding muscles
Girl in the Poodle Skirt Twist (Deer Pose) - feet wide, take knees to one side, sit upright dropping SITZ bones - explore relationship to surrounding muscles
1/2 seated wide angle forward fold - Stretch
Twisting Wide Angle Forward Fold - Stretch and Strengthen
Wide Angle Forward Fold - Strengthen
Wide Angle Upward Plank - Strengthen
Child - Rest
Wednesday, March 6, 2013
Deep hip opening class
By request, here is (more or less :-) the sequence from last Sunday's Intermediate Yoga class at Yoga del Sol. All about relaxing, opening and accessing some of the toughest, most avoided parts of our bodies - pelvic floor, short adductors (upper inner thighs) and inner hamstrings. It also give a deep general hip opening. If wide legged poses are challenging for you, if you feel restricted in forward bends but aren't sure why, or if you have tight hips, this could be a great exploration for you.
Take this sequence slow, keeping an observing awareness deep in your hips and groin. Look for any sensation of breath in your hips and groin. Take breaks to just feel after anything that might have been intense or altering. Any questions, just ask. Enjoy!
- Legs up the Wall Pose 10 minutes (a sandbag on the soles of the feet can be lovely here)
- Savasana with belly breathing with a sandbag laid across the upper thighs, moving into Dirgha and maintaining Dirgha for the remainder of your active practice
- Puvana Muktasana/Knee to chest - then take the knee toward the armpit
- mini-savasana
- Pelvic tilts
- Bridge Pose - rolling up and down
- Knees to chest, pointed toes <--> legs toward sky, flexed feet
- 1/2 Dead Bug Pose <--> straight leg reclining twist (here's a video link - http://www.youtube.com/watch?feature=player_embedded&v=00lB10oATck - thanks to the folks at - Yoga Tune Up for the great little vinyasa!)
- mini-savasana
- Reclining Hip Circles with weight (here's a video link - http://www.youtube.com/watch?feature=player_embedded&v=iQv0IuYKNUc - thanks again to the folks a Yoga Tune Up for this fun move!)
- Baddha Konasana - no fold, just lengthen spine with feet as close to bottom as possible
- Cat/Dog
- Toes Tucked Child's Pose
- Shins down Upward Facing Dog
- 1/2 reclining hero (or hero)
- Deep Wide Legged Utkatasana
- Mountain Pose
- Side Angle Pose (feet wider than usual. Looking for the stretch in the BACK inner thigh)
- Uttanasana with knees slightly bent
- Goddess Pose
- 1/2 Wide Legged Forward Fold (back parallel to floor, knees slightly bent)
- Wide Legged Forward Fold
- Triangle
- Malasana (deep squat squeezing inner thighs into sides of torso)
- Reclining Hero or Hero
- Shins down Upward Facing Dog
- Child's Pose
- mini-savasana
- Bridge Pose
- Dead Bug
- Anything else you'd like
- Savasana :-)
- Pranayama Meditation - use your inhale to fill entire torso pelvic floor to soft palate, use your exhale to completely empty while keeping your spine long
Friday, March 1, 2013
Massage your Upper Back with this Bridge Pose variation
Here's a great pose to add in to your practice when that upper back feels tight - it gets right into those rhomboids! I learned this variation of Bridge Pose from Gary Krafstow years ago and its still one of my favorites. He calls it Dvi Pada Pithum, the 2-footed posture. I think this is a great way to think of it because it reminds us that our base is still our two feet. This helps to keep weight in the feet, work in the legs and avoids too much pressure into the shoulders, upper back and neck.
Lie on your back, soles on the floor hip width apart, knees bent. Bring your arms up toward the sky and interlace your fingers, palms moving together.
On your inhale, press down with your straight arms and your feet rolling your hips and back upward. The shoulders are pressed into the floor by your straight arms.
On your exhale, roll your back down as you lift your hands toward the sky thus lifting your shoulders. No need to lift your head.
Each breath's actions are simultaneous not one at a time. So, as you inhale, its hips rising and shoulders pressing down. As you exhale, its back rolling down as the shoulders lift.
As with all bridge pose variations, you want no pressure on your spine or in your neck, this is a sign you are going too far.
If you have been experiencing discomfort in your upper back and shoulders for a while, especially if you have that awful stabbing pain between your shoulder blades, follow Dvi Pada Pithum with supported fish to really help release the upper back muscles and open your chest. Deep breaths to feed muscles and relaxation :-)
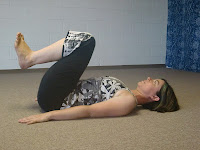
 |
| Dvi Pada Pithum. Hips up, shoulders down |
 |
| Dvi Pada Pithum. Hips down, shoulders up |
| Dvi Pada Pithum. In transit |
Lie on your back, soles on the floor hip width apart, knees bent. Bring your arms up toward the sky and interlace your fingers, palms moving together.
On your inhale, press down with your straight arms and your feet rolling your hips and back upward. The shoulders are pressed into the floor by your straight arms.
On your exhale, roll your back down as you lift your hands toward the sky thus lifting your shoulders. No need to lift your head.
Each breath's actions are simultaneous not one at a time. So, as you inhale, its hips rising and shoulders pressing down. As you exhale, its back rolling down as the shoulders lift.
If you have been experiencing discomfort in your upper back and shoulders for a while, especially if you have that awful stabbing pain between your shoulder blades, follow Dvi Pada Pithum with supported fish to really help release the upper back muscles and open your chest. Deep breaths to feed muscles and relaxation :-)
Friday, February 22, 2013
BREATHE!
Podcast Powered By Podbean
In times of stress or pain, one of the first things we usually do is stop taking deep breaths exactly when we need them most. This breath awareness and pranayama practice will help you cultivate a deeper breath and a deeper awareness of your breath; so when the going gets tough, you can breath/breeze right through it! Click on the player to listen or visit http://yogadelsolstudio.podbean.com/ to listen to this and other short audio classes with me.
Friday, February 15, 2013
Ah, savasana!
What did I do last weekend? I had a great yoga practice ... it lasted almost all weekend long. It was waaaay too windy to do anything productive outside and I felt like a major homebody. So I did a lot of savasana... I gave myself permission and I pursued savasana like I could perfect it. And now I feel like I had a vacation. How many hours of savasana do you think you can do in one weekend? Give yourself a savasana challenge this weekend and see how spacious can your life, your mind, your body can become!
Instructions for savasana? Lie down comfortably, with as many props and blankets as you need to be comfortable and cozy. Set a timer for what you would like your minimum savasana to be (you can always stay longer, but pledge to yourself to stay at least 8-10 minutes, this will get you started). Close your eyes and go inside, staying present to the relaxation of your body, mind and soul.
Consider this in your practice... I was in a workshop once where Judith Hanson Lasater posited that it takes at least 20 minutes for the average person to truly become relaxed. In my own practice, I experience a shift into relaxation at about 8 minutes, but, just as she said, my deepest relaxation doesn't start until I'm about 20 minutes into my savasana practice. How long is it for you?
Friday, February 8, 2013
Shoulder Exploration and Strengthening!
Understanding your shoulders is key to
avoiding injury in this relatively weak joint. Explore downward
facing dog and dolphin pose to feel how all the muscles work together
to keep you safe and strong.
A warm up is advised prior to this brief but powerful exploration... consider warm ups to open the spine (i.e. 6 movements of the spine, sun salutations), shoulders (i.e. sun breaths, arm circles, cactus/robot arms), and wrists (i.e.anjali mudra variations, wrist circles, tractioning wrists). These same practices as cool downs (plus poses like bridge and reclining twists) will help to prevent soreness the next day.
This practice is helpful for all, but especially those beginning to explore arm balances.
Friday, February 1, 2013
Tight legs? Loosen up with this short yoga practice!
Tight legs, sore feet, funky ankles? Its important to have good lower body circulation - keeps you warm, keeps your muscles limber, helps to prevent things like clots - all good stuff! This lunge/squat series will help stretch and open your entire lower body from hips to toes. Whether you are tight because you are an athlete or a desk jockey, this sequence makes a great stand alone practice, warm up or cool down. Enjoy!
Thursday, January 24, 2013
Sitting too much? Here's a yogic antidote!
Grab your bolster (or a few sturdy folded blankets) and get ready to unwind...
 |
| First, let's let go of that hunched upper back... lay your back on your bolster with your bottom still on the ground. Leg and arm position can really change things here, so experiment and find the best spot for you. HINT: If you feel tight, keep your knees bent and your arms by your sides. If your low back bothers you in this position, just scooch your bottom further from the bolster. Spend some time here, at LEAST 20 full steady breaths. |
 |
| Next, let's open the rib cage and upper shoulders so you can REALLY breathe :-). Keep your bolster as it is and sit on one end. Lay your back down on the bolster, letting your shoulders hang off. Make sure your head is completely on the floor, but the tops of your shoulders should be a little above the floor. This will begin to open your pecs and lower ribs nicely. Again knees bent is a little gentler on the low back. Stay here at least 20 breaths, letting your breath do all the work. |
 |
| Now let's begin to open the front of the hips, releasing that crease you'r seated position likes to etch into them... turn your bolster sideways and sit on it. Lay your shoulderblades on the the floor and stretch your legs our as far as it feels comfortable. You may need to scooch up or down a little to find the sweet spot. Again, spend at least 20 breaths here, just relaxing. |
 |
| Finally, turn your bolster to a comfortable height and place your knees over it as you lie back in savasana. This gentle elevation of the legs helps with circulation and invigorates the legs. Your back will settle more comfortably on the floor after all the backbends, enjoy the feeling of your breath moving your back gently against the floor as you rest as long as you like. |
Wednesday, January 16, 2013
Five meditations to kickstart your practice
It can be hard to start a meditation practice... it can be harder to keep a meditation practice going. If you are looking to start or looking to stay on track, here are a few practices to play with.
Remember to set your timer so there is no need to check your clock. Ignore any and all outside distractions while you are meditating - this time is for you! If you are new to meditating, start with just a few minutes and gradually build up to a time that feels right for you. And on those more difficult days, remember there is a reason it is called a practice :-)
1. Counting Meditation - Sit, counting your breaths up to 7, then begin again at 1. If you get distracted, just start again at 1.
2. Meditation on the Breath - Sit, feeling each and every aspect of your breath, nothing more.
3. Observing Meditation - Sit, watch your thoughts as they move across the screen of your mind. Watch, without becoming involved.
4. Mantra Meditation - Sit, repeating a mantra, continually emptying your mind of everything else. I recommend the mantra "I am" (or in sanskrit "So Ham").
5. Mudra Meditation - Sit, bringing your hands in to an appropriate mudra for you (just google mudra, you will find many options, all of which are said to elicit different responses in your body and mind), let everything else go but the sensation of the mudra.
Try one or all of these meditation practices - different practices resonate differently with everyone, sometimes you have to try a few before you find the one(s) most helpful to you. Do not be discouraged, you WILL find it.
Enjoy!
Tuesday, January 8, 2013
Shoulder Relief!
Shoulders feeling tight, noisy, slumped? Neck achy, maybe nonexistent? This is the practice for you. Short, sweet and effective... give your shoulders a little relief in your practice, at your desk, whereever you may be!
Click here or below to access our practice.
Click here or below to access our practice.
Subscribe to:
Posts (Atom)